6Uploads
2k+Views
230Downloads
Art and design

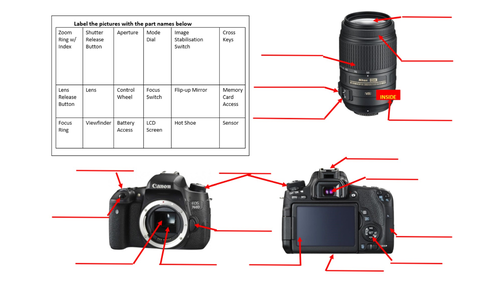
Labelling a DSLR camera
Labelling activity worksheet and answers, both provided on a PowerPoint.
Designed for students starting GCSE photography.
Students are to label the different parts of the DSLR in order to develop an understanding of the location of important camera features and key terminology used in the subject.

Photoshop Tutorial - Colour Rim Light Effect
Exploring portraiture and lighting setups with your Art, Photography or Media students? This tutorial will allow students to explore ways of adding dramatic colour effects to portraits without specific lighting resources.
Using this tutorial, learners will develop greater confidence with Photoshop’s more advanced controls, including blend modes and ‘Blend if’ options.
This resource includes 1 Photoshop Tutorial, presented on PowerPoint, which can be shared digitally or in printed format. Each slide has instructions and example screenshots of the process.

Understanding the Exposure triangle in photography
This resource is a small PowerPoint that includes:
a short labelling activity for the exposure triangle in photography (Worksheet can be printed from the PowerPoint slide).
a set of interactive scenario question slides that use the previously completed worksheet to achieve correct exposure and creative effects.
These tasks are designed for beginner GCSE photography students, in order to help them understand the different aspects of the exposure triangle (Aperture, Shutter speed and ISO) and the thought-process required in making adjustments on a DSLR camera to achieve a correct exposure. Works best when coupled with practical DSLR activites to put this knowledge to use.
Notes on use of interactive slides:
When presenting these question slides, click on the answer that the selected student or group decide on. Clicking a specific box will change the slide to effects of that answer. Discuss with group as to why the chosen answer is correct or not. Then click on the blue NEXT or GO BACK slides that appear.

Introduction to Matisse lesson resources
This resource is a PowerPoint that includes:
a presentation on the artist Matisse, with aims/objectives, appropriate information, imagery and YouTube video links.
2 task worksheets. Task 1 is a ‘fill in the gaps’ worksheet which students can use to actively engage with the presentation. Task 2 is a worksheet that allows students to respond to learning with their own writing. It challenges them to focus their writing on specific points, and provide their own opinions on the work of the Matisse.
The aim of this resource is to introduce students to the work of the artist Henri Matisse. This lesson should build their understanding of his career, unique ‘cut-out’ style, and the themes present in his work.
This resource is designed to be used for a single lesson, however could be adapted over multiple. It is created and used by myself for KS3 art lessons, but could equally be presented to KS4 students.
Notes on use of interactive slides:
Some slides contain links to YouTube. If video does not play, click the link and it should load the webpages.

Introduction to Banksy lesson resources
This resource is a PowerPoint that includes:
a presentation on the artist Banksy, with aims/objectives, appropriate information, imagery and YouTube video links.
a 10 question worksheet which students can use to actively engage with the presentation.
5 higher order thinking questions to challenege students to reflect critically on the work of Banksy.
a set of keywords with definitions specific to Banksy.
The aim of this resource is to introduce students to the work of anonymous street-artist Banksy. This lesson should build their understanding of his style, themes and impact on popular culture.
This resource is designed to be used for a single lesson, however could be adapted over multiple. It is created and used by myself for KS3 art lessons, but could equally be presented to KS4 students.
Notes on use of interactive slides:
When presenting these slides, some elements will be animated and require to click through. Some slides contain links to YouTube. Click the links and it should load the webpages.

Formal elements and Compositions in Photography
This resource contains 2 PowerPoints that include:
a presentation designed to cover at least 3 lessons, with clearly detailed instructions for delivery.
information on the formal elements of art and design, and several key compositional techniques often used in photography.
a retrieval practice starter activity for each lesson, designed to develop students recall.
a printable help-sheet slide for students during practical lesson.
a personal learning checklist for the topic.
a student template PowerPoint, which students can complete with a clear structure linked to the teacher resource.
The aim of this resource is to introduce or reinforce learning on the formal elements of art and design, and also introduce key compositional techniques in context of the photographic medium. These lessons should build their understanding of these concepts and provide opportunity for students to experiment them.
This resource is designed to be used for at least 3 lessons, however could be adapted over more. It has been created and used by myself for KS3 lessons, but could equally be presented to KS4 students.
Notes on use of interactive slides:
When presenting these slides, some elements will be animated and require to click through.
This resource has been developed on Google Slides and may have some small formatting issues when opened in PowerPoint; text box size/placement, etc.


